Saturday, December 22, 2012

The only disability in life is a bad attitude. ~Scott Hamilton

So I need to do a little up to dating on Iroh. Iroh currently is hibernating. He is in a storage shed as I have no money or space to work on him over the winter. My dad's Chevelle got to move back home for the winter. However, before parking Iroh we got the brakes plumed  the frame pulled, fuel cell hung and even started the engine again. Starting the engine again did require removing the intake and having it machined. That took care of the vacuum leak and she ran beautifully. I'll get the new video embedded or a link to it. I'll also put up some photos of the recent up dates to it.
I did have a scary moment when I was taking Iroh to school to put on the frame rack. She tried to jump off the trailer. I'll put up a pic of her hanging off the back of the trailer. So lucky she didn't fall she held on by a thread and lucky she is light enough my friend Connor, my brother and I were able to lift her back on.

Fuel Cell mounted with custom made straps (cheaper then buying them)
 Iroh at school after frame pull
 Iroh hanging off the trailer on the way to school.

Tuesday, October 2, 2012

Wheresoever you go, go with all your heart. ~Kongzi


Iroh is getting brakes once again. Brake lines have now been run and all that's left is to fill the reservoir and bleed them out. The rear end was pulled completely out and painted, and pan hard welded in. I've modified the front inner fenders to fit the new front suspension, even got a new air filter that better accents the beauty that is that big orange rat between the frame rails. I don't want to chat too much so I'll post some pictures and let them do the talking.
Rear end painted (Keystones from my brother, fit better than the steel wheels)
6 inch tall air filter, still have hood clearance
Brake lines so to have stopping power
 Got to make some custom brackets to mount the brake lines on the rear axle


Tuesday, August 14, 2012

It's so hard when I have to, and so easy when I want to. ~Annie Gottlier

I always enjoy ordering new parts for my project. When ever they arrive it feels like Christmas. I'm still waiting for the coil overs for the rear suspension, but I ordered and received new Hooker headers and Comp Cams aluminum roller rockers. I love the look of the roller rockers compared to stock, and the extra horsepower is nice too.
I've recently contacted the former owner of my truck and he is planning to come see my progress. I have been working on it for over 2 years now. I have set the deadline of the 26th, which is when he will come see it, I plan to have the firewall in primer and the engine and transmission back in. I also plan to have all the fenders put on. I'm excited because I haven't seen the rear fenders with the Cadillac tail lights on. When I do get it together you can count on pictures being posted.
I don't know how much work I will be able to accomplish over the winter, simply because of funds. I have another year of school to pay for. I will still see how much I can accomplish up until the money runs out for the year.


Sunday, July 29, 2012

Circumstances may cause interruptions and delays, but never lose sight of your goal. -Mario Andretti

I finally got to do what I have wanted to for a long time now. I heard the big block fire up. The engine hadn't been started in a couple years. We mocked it up on the engine stand, with some old headers. The headers were not the best. They left no room for spark plug wires, so we used an old set so we wouldn't melt the new ones. We are hoping the wires are to blame for the miss fire. Otherwise the engine seemed to run well with little timing adjustments.
We tore the engine back down and checked compression, which was alright, and loosened the rockers to close the valves. We pressurized the cylinders and had a little bit of valve leak. I'm hoping it is just carbon or oil gunk that can be easily loosened up and blown out. But if I have to I guess the heads will be coming off.
After timing it still had a miss fire but got it to idle

Monday, June 18, 2012

If I had all the money I'd spent on cars ... I'd spend it all on cars. - Scott Fisher

Just wanted to do a quick post and give you some pictures of Iroh backed into the driveway. It doesn't have the coil overs on the back or the pan hard, but the four link is welded in and there are some wood blocks holding the frame up where I expect it to sit. It is worthy to note these pictures were taken two years and 3 days after I bought the truck.


Tuesday, June 12, 2012

Don't say anything and we'll get along just fine.

I'm excited to say I have received the four link rear suspension I ordered through summitracing.com. It is the Heidts bolt on four link kit for the 55-59 Chevy pickup. I've been getting it mocked up but I am waiting for the coil overs before I do any welding. I don't want to have to notch the frame for suspension travel. For now or as shown in the pictures the axle is jacked up all the way to the frame just to simplify measuring.

I'm waiting to weld the brackets to the frame because they have a slight angle to them. I want to make sure the shock will still fit. All 4 bars have been set to the same length, but if the coil overs won't fit I will have to adjust the length of the bars to try and square them up. The upper shock mount with the kit needed slight modification to fit. As the truck is old enough I figured the frame wouldn't be the same for all trucks... after 57 years. So we drilled the holes out ever so slightly bigger but still extra motivation was needed to maneuver it into place.
I hope with my next post to include a picture of the truck in the driveway on all four wheels. I can't wait to see it.

Thursday, May 17, 2012

"It's a never ending battle of making your cars better and also trying to be better yourself." -Dale Earnhardt

It's been a while since my last post, mostly due to my computer dying on me... again. Enough with that though, I am still making progress with Iroh. I've been working on getting the brake pedal bracket mounted under under the dash. This required trimming of the stock dash bracket. We got measurements online for where to mount the booster. after measuring and drilling holes I was able to trim up the bracket and keep some to still help hold the dash. The bracket we picked up out of a newer Chevy pickup at Nordstroms auto recycling. I trimmed that also so it would fit under the dash. I will be trying hang the gas pedal this weekend.

I have cut out the floor board and the stock transmission cover for a new transmission tunnel. I will weld in the whole stock transmission cover, and finish the firewall and tunnel once the engine is back out. The engine will be back out after both pedals are hung.

Soon also I will be ordering the new four link rear suspension. I have begun removal of the stock rear end. The axle it self came out fairly easy. However the leaf spring brackets riveted to the frame are putting up much more of a fight. A bigger air compressor or a torch would benefit me greatly. One way or other it will come out.

Hopefully my next post will not be a long way off and hopefully have pics of the four link.

Brake pedal and Bracket
 Dash Bracket before modifications
Holes marked and predrilled for brake pedal and booster
Hole cut for bell housing and transmission
I mocked the tunnel up with cardboard then cut and bent it out of 20 gauge sheet metal
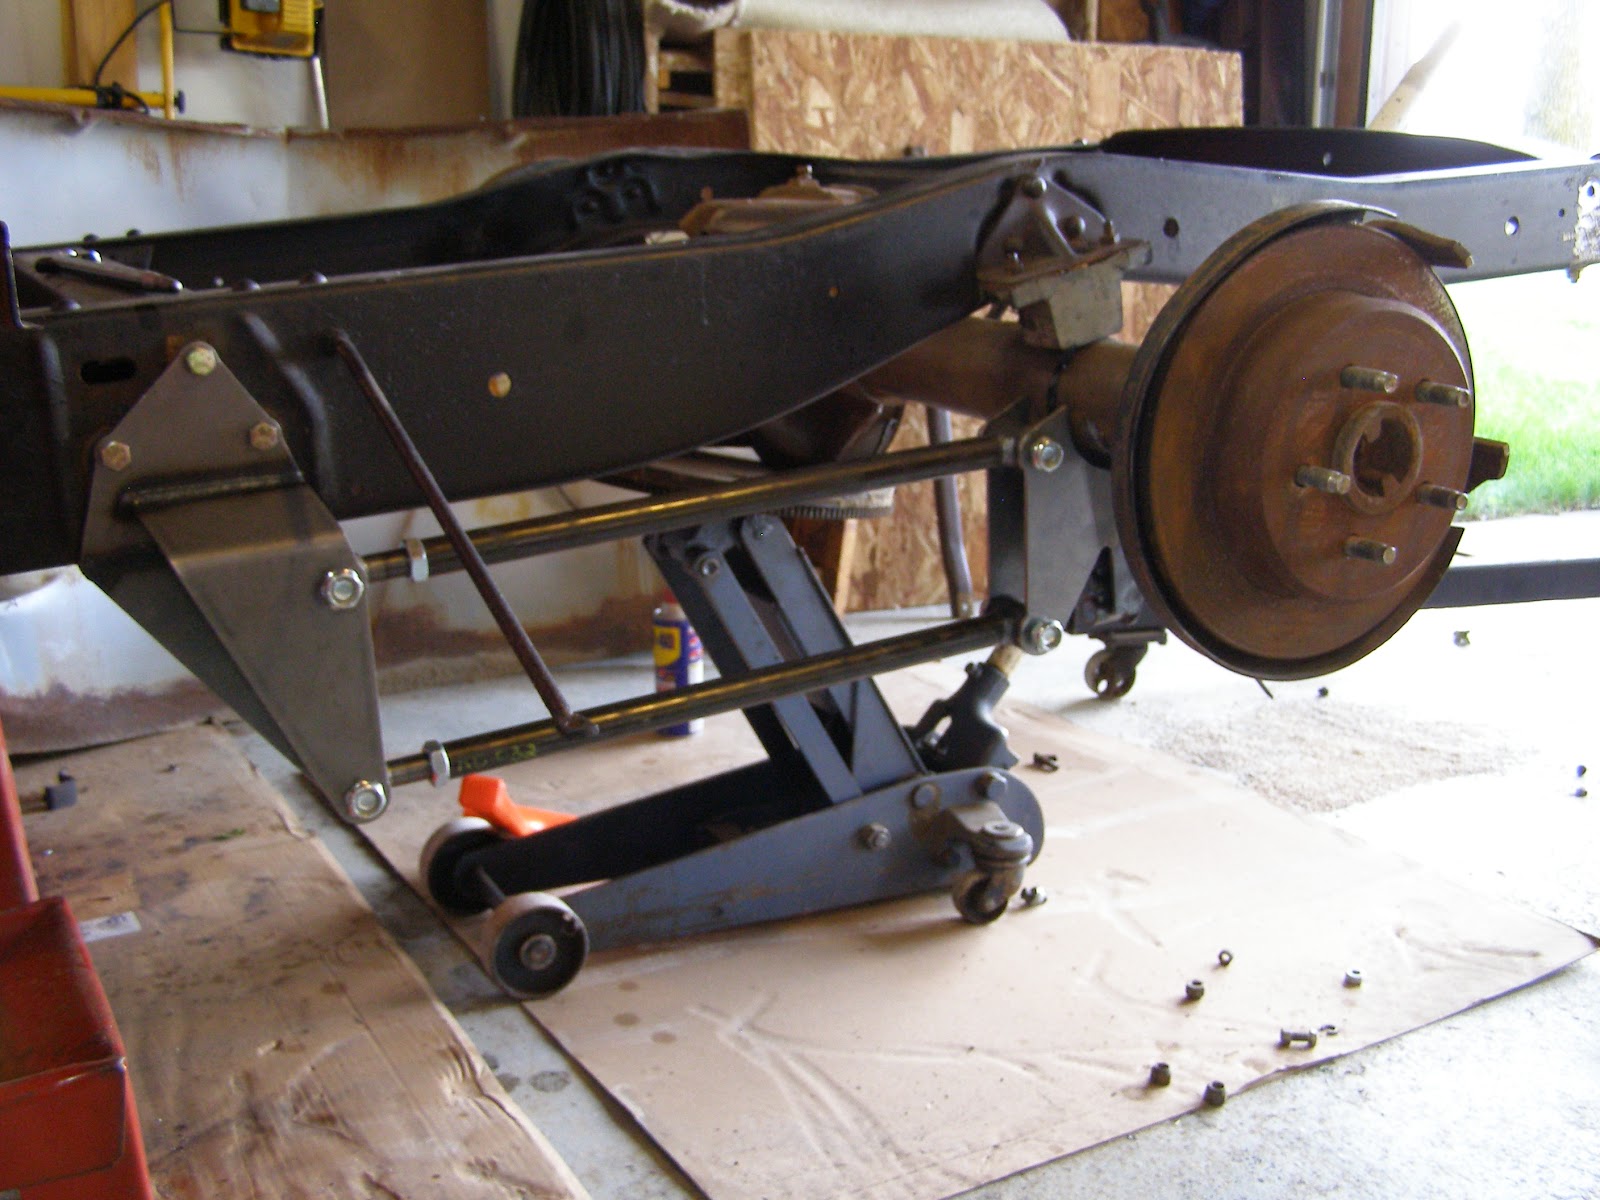
Stock rear end preparing for removal
 Stock rear end removed making room for the 8.8 and 4 link

Thursday, April 12, 2012

“I have bad reflexes. I was once run over by a car being pushed by two guys.” -Woody Allen

I was quite excited to be able to bring Iroh home for the summer. I have made the progress I was hoping to while at John's for the winter. I'll post the picture of how it looked before going to John's and how it looked back home. There was a big difference and I'm very pleased. The door was no longer tied on, I got it bolted back on with its rebuilt hinges. My plans for Iroh this summer include the 4 link rear suspension. I plan on ordering that in May so be watching for updates as I cut off the rear axle and suspension, prep and mount the new suspension and rear end.
If you are thinking about ordering a mustang II front suspension here are some things I've experienced with it. Towing it back into town, it had a much nicer ride. I had to buy longer tie rod ends than what was provided in the kit. Make sure all the parts are there when it arrives. We had to wait a while to get the shocks in, they were back ordered for a while, and we were missing the ball joint spacers. I will see where the truck settles to for a ride height. Since I order the 2" dropped spindles, if it is too low I will order the other spindles. Overall I am pleased with the mustang II front suspension from speedwaymotors.com
Iroh Fall 2011
Iroh Spring 2012

Tuesday, March 13, 2012

On second thought, let's not go to Camelot. It is a silly place.

Well it has been a while since I have posted about my own truck, and I don't want to let my dedicated readers down. The work on the fenders at school is done, and I am waiting until I can pay for the supplies and bring the last fender home. I'm excited to see the taillights on the truck, but I still have a lot of body work left to do. Since the completion of the suspension, which just the tie rod ends need to be attached, I have done other work on the firewall and transmission work. I need to make an intermediate shaft for the steering, so we can steer when it is time to bring the truck back home.
Here's the firewall
I made another plate and welded it in to hold the bottom of the steering column on the firewall but that is not pictured.
I had a 400 turbo trans and tore it down for rebuild, as it had an electronic speedometer sensor in it I ended up buying another 400 turbo with the mechanical speedometer, as it was cheaper than buying it new. The new case was much cleaner than the first trans so I tore that one down and I'm currently putting it back together. I still don't understand how it works, but I sure hope it does work once I have it back together.

Sunday, February 19, 2012

"It's not dying that you need be afraid of, it's never having lived in the first place." -Britt Reid

The title quote is from the movie "The Green Hornet", Which is what my friend named his project truck. This post I decided to show you the truck my friend has been working on. He picked up a '71 Chevy C10 long box which looked like this in the beginning.

With clearly a lot of work to do he brought it to school for body work then the following year for paint. He chose the color "Synergy Green", from the new Camaro. I'll put those pics up at the bottom. It still need a lot of mechanical work. It still has the original 350 and four speed. The plan is to rebuild a 400 turbo to make it an automatic. The motor will need some attention as it is quite the smoker going down the road, and hopefully some new brakes to stop him when he needs to.
The Color on the truck turned out looking better than I imagined it would. For a long box it is a lot of green but once he gets some new rims it will help the look more than the steel wheels do.
"The Green Hornet"


Saturday, February 4, 2012

Walking isn't a lost art - one must, by some means, get to the garage. ~Evan Esar

It's time for a new post, I can show everyone something I had been waiting to see for a while. I finally saw the engine between the frame rails. I got the engine cross member welded in and the trans cross member ready to bolt in. The engine wasn't kept in as we needed to do transmission work. We are gonna be rebuilding the trans, and I need to do work on the firewall and frame for the steering rack. 
 In progress on my rear fenders I completed one of them, so I also get to post a picture of the rear fender with tail light, just the way I imagined it.
Now gonna end on a completely different note and show a painting I did of Iroh. I hope everyone likes it.

Saturday, January 21, 2012

"Aerodynamics are for people who can't build engines." -Enzo Ferrari

I've been meaning to get on here to update my progress for a couple days now and everyday I've kept making more progress. So I'm gonna get you caught up cause I'm very excited about where I'm at now. As in my last post we were getting the upper and lower control arms on. We had some issues getting the springs in, compressing them with ready rod wasn't working. We finally bought a spring compressor, that worked using it in the same way we were doing with the ready rod. just dropping the rod through the spring hat and using only the bottom spring hook, pulling the spring up until we could get the ball joints bolted in.
With the spindles in we moved on to looking for space to install the rack and pinion steering. We eventually just cut out the whole stock cross member. I've boxed in the rest of the frame up to the front, and I'm going to weld in a inch and half or two inch metal tubing under the radiator support. The rack isn't installed yet as we have to notch out the frame for the rack to have space to reach the spindles. We also installed the brake rotors, but no calipers yet as I'm going to get them painted before installing them. 
I was really excited today as we we're starting mocking up the engine and trans for their cross members. Which means I finally got to see the Rat between the frame rails. The truck makes the 454 look small. But I think it will be a lot of fun and still can't wait to drive. We didn't get final markings for position of the cross members, but hopefully tomorrow I will. So here it is, I will leave you today with the engine and trans between the rails.

Sunday, January 8, 2012

Batteries not Included, Some Assembly Required.

My suspension has finally arrived... well everything but the shocks. We had everything suspension wise as far as we could go without the components so we called speedway motors and told them to ship what they had. Got home from work and had seven boxes waiting. It was like Christmas all over. So what I have accomplished since the last blog, I boxed in the frame, and notched it for the cross-member to slid into place. I tacked it and the spring hats to the frame. That was when we had to wait.
When the components arrived we drilled out the cross-member to fit the larger lower control arm bolts. We actually ended up cutting the tacks and removing it from the frame to use a drill press to drill the holes. With the cross-member rejoined with the frame we positioned the lower control arm, the upper control arm, and the spindle. We checked the camber and removed the control arms for welding. It is not yet welded in but should be one of the nights this week.
I'm very excited with how everything is coming together. These are the two inch drop spindles, and as we have read in reviews of the mustang II suspension, apparently even without the dropped spindles it gives the truck an "in the weeds" look. I'm curious to see how low she sits. As you can see the spindle, which would be the center of the wheel, is next to the frame rail. The stock ride put the center of the wheel below the rail. Or the other way I think about it, with the frame on the jack stands it sits lower than it did on the wheels. It will be interesting to see how low she goes.